
The way people enjoy their daily cup of coffee has changed dramatically thanks to the Keurig coffee maker, a household name in the world of single-serve coffee makers. Use keurig coffee maker. Keurig machines are well renowned for being straightforward and effective, making them a popular option for busy people and coffee enthusiasts.
Describe the appeal and practicality of Keurig machines.
The unprecedented convenience of Keurig coffee makers is a major factor in their success. A Keurig only takes a few minutes to prepare the ideal cup of coffee, tea, hot cocoa, or even cold beverages. Using K-Cups, which are pre-packaged pods with ground coffee or other beverages, is convenient. The entire brewing procedure is simpler using these pods, which do not require measuring or grinding coffee beans. Additionally, Keurig provides a large selection of K-Cup flavours and brands to accommodate a wide range of tastes and preferences.
The speed of Keurig machines is also well known. They quickly heat Water, so you won’t have to wait for the coffee to steep or the Water to boil before you can enjoy your beverage. They are, therefore, perfect for those hectic mornings when every second counts.
Mention the significance of being able to utilise a Keurig efficiently.
Although Keurig coffee makers are made to be simple, it’s still important to know how to use them properly. Knowing the proper procedures from preparation to brewing guarantees that you always get the best cup of coffee. Additionally, regular use and maintenance can lengthen the life of your Keurig device, saving you money over time.
In our in-depth manual, we will walk you through every step of using a Keurig coffee maker so you can get the most out of this fantastic device and enjoy every sip of your preferred beverages. This book will provide the information you need to become an expert Keurig user, whether you’re a new owner or looking to hone your brewing abilities.
Jump to a Specific Section
Understanding the Keurig Coffee Maker’s Basic Functions
The preparation of coffee is made simple by Keurig coffee makers. They operate under the simple premise of single-serve brewing, which guarantees a dependable and practical experience.
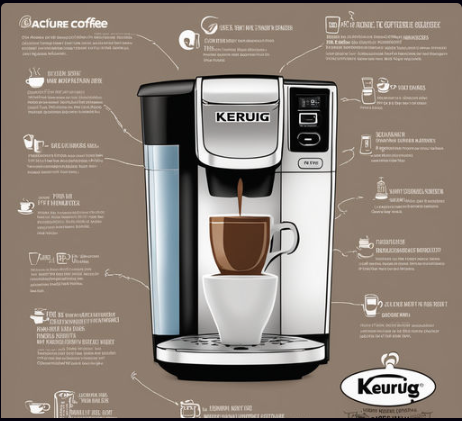
1. Mention the Keurig machine’s parts (the water reservoir, the K-Cup holder, etc.)
– Water Reservoir: You add Water to the water reservoir to brew your beverage. Depending on the model, it normally has a capacity of 40 to 80 ounces.
The K-Cup, which contains the coffee grounds or other beverage components, is placed in the K-Cup holder. During brewing, it breaks the K-Cup’s seal and forces hot Water through the pod.
The magic takes place in the brewing chamber. Water is heated and pumped through the K-Cup in the brewing chamber, where it is held while your beverage is being brewed.
– Drip Tray: The drip tray is intended to catch any drips or spills and is positioned beneath the brewing chamber. It is detachable for simple cleaning.
– Control Panel: Although it varies from model to model, the control panel normally has buttons for choosing the brew size and, in some cases, strength and temperature settings.
2. List each step of the brewing process.
– Step 1: Add Water – Start by adding fresh, icy Water to the reservoir. You can get guidance on how much water to add from the machine’s water level indicator.
– Step 2: Power On – Plug in and start your Keurig device. The Water will begin to warm up right away.
Lift the K-Cup holder and place the K-Cup pod of your choice inside. Close the K-Cup holder after making sure it is firmly in place.
Choose your preferred brew size, such as 6, 8, or 10 ounces, using the control panel in step 4. Other options might be available for some models.
Press the brew button in step five. By creating a hole in the K-Cup, the Keurig will let hot Water pass through the coffee grounds. Brewing often takes less than a minute.
After the brewing process is over, your freshly produced beverage will be ready to be consumed. Remove the K-Cup with caution, then enjoy your coffee, tea, or other beverage.
Query FAQs:
1. How does a standard Keurig operate?
A simple Keurig brews a single cup of coffee, tea, or other beverage by heating Water, puncturing a K-Cup pod, and forcing hot Water through the pod. It streamlines the brewing procedure and does away with the need for conventional coffee-making stages, including weighing, grinding, and carafe brewing.
2. Keurig: Is it just for coffee?
No, Keurig machines can prepare a variety of drinks, including coffee, tea, hot chocolate, iced coffee, and more. They are adaptable and versatile. There is a large assortment of K-Cup pods to choose from.
3. Is Keurig espresso or coffee?
– Instead of espresso, Keurig mostly makes coffee. The genuine espresso extraction process used by espresso machines is not replicated by some K-Cup pods, despite their claims to provide beverages with an espresso-like flavour.
4. Does Keurig only produce instant coffee?
– Contrary to instant coffee, Keurig brews coffee from ground beans inside the K-Cup pod, resulting in a cup that is fresher and more flavorful.
5. What distinguishes a coffee maker from a Keurig?
– While Keurig is made for single-serve brewing, traditional coffee makers typically brew bigger quantities of coffee in a carafe. While coffee makers are better suited for those who prefer larger quantities or want more control over the brewing process, Keurig offers convenience and diversity.
How to Set Up a Keurig Coffee Maker
For optimal performance and lifespan, your Keurig coffee maker must be set up properly. To prepare your Keurig for making your preferred beverages, follow these steps.

constructing and opening the machine
- – Carefully remove the packaging from your Keurig coffee maker.
- – Verify that all parts, including the power cord, drip tray, K-Cup holder, and water reservoir, are present and undamaged.
- – Assemble any detachable components, such as the drip tray and K-Cup holder, in accordance with the manual’s assembly instructions.
Plugging in and turning on the power
- – Choose a spot for your Keurig that is convenient and close to an electrical outlet. Make careful to position the machine on a level surface.
- – Insert the power cord into the wall socket.
- – Turn on the machine’s power switch, which is normally found on its back or side. The first startup of your Keurig will start, which involves heating the internal water tank.
Preparing the Keurig for use for the first time
- – Prime the machine before using it for the first time after turning on your Keurig. This entails putting the system through a few cycles of hot water to make sure it is clean and prepared for brewing.
- – To properly prime your Keurig, follow the detailed directions in your user manual. To make sure the machine is clean and ready for use, it usually includes filling the water reservoir and doing one or more brew cycles without a K-Cup.
- – This prepares your Keurig for brewing your first cup of coffee or other beverage and helps remove any leftovers from the manufacturing process.
Registering the device (if necessary)
- – You can register your Keurig machine in one of two ways: online through the Keurig website, or with the paper registration card that comes with some models.
- – Registering your Keurig may provide advantages including warranty protection, access to product updates, and customer support.
Follow the directions in the user manual or on the registration card to register your Keurig. Your contact information and the machine’s serial number, which can be found on the back or bottom of the device, are typically required.
By finishing these setup procedures, you can be confident that your Keurig coffee maker is prepared to provide scrumptious and practical beverages. Once your Keurig is set up, you can move on to choosing and brewing your preferred beverage with the aid of the device.
Getting Ready to Brew
It’s crucial to set up your Keurig coffee maker correctly before brewing your first cup of coffee or other beverage. This guarantees that your beverage will be prepared just as you prefer. This comprehensive instruction on getting ready for brewing:
Choosing the appropriate K-Cup
- – The K-Cup you choose has a big impact on the taste and quality of your beverage. A vast range of K-Cup pods, including various coffee blends, teas, hot chocolates, and specialty drinks, are available from Keurig.
- – When selecting a K-Cup, take your taste preferences into account. There is probably a K-Cup that meets your taste, whether you enjoy a strong, dark roast coffee, a light and fruity tea, or a creamy hot cocoa.
- – To assure freshness, look at the K-Cup’s expiration date. Coffee and other beverages might lose flavour over time.
filling and inspecting the water storage tank
- – If the Keurig machine’s water reservoir is removable, lift it out and inspect it for dirt, debris, or other contaminants.
- – If necessary, rinse the reservoir with cold, clean water and make sure it is totally dry before putting it back together.
- – Pour new, icy Water into the reservoir. To calculate the appropriate amount of Water for your specified brew size, use the water level indicator. Don’t fill it too high.
Choosing your preferred cup size and brew strength (if necessary)
- – You can alter the cup size and brew strength on some Keurig models. Use these options, if your model has them, to customise your beverage to your tastes.
- You may normally choose between ordinary and strong beers using the brew strength settings. A stronger brew will have a richer flavour.
- – On the control panel, choose the cup size you want. The usual choices are 6, 8, and 10 ounces. A few models come in larger sizes as well.
- – Be aware that the size of the cup you select will impact the intensity and flavour of your beverage. A larger cup will provide a milder brew, whereas a smaller cup will produce a stronger coffee.
Preheating the appliance (if your model requires it)
- – Before you can begin brewing, certain Keurig machines need to be briefly heated. By doing this, the Water will be at the perfect temperature for brewing.
- – Verify the preheating requirements for your Keurig model in the user manual, then follow the detailed instructions. Typically, preheating entails starting a hot water cycle without a K-Cup.
- – Preheating guarantees that the first cup of coffee or other beverage you make is brewed at the ideal temperature, increasing flavour and aroma.
You can ensure a great and pleasurable brewing experience with your Keurig coffee machine by carefully following these preparation instructions. You’re ready to insert your chosen K-Cup and begin the brewing procedure once your machine is ready.
Using Your Keurig to Brew Coffee
It’s time to brew your preferred cup of coffee or beverage now that your Keurig coffee maker is ready. In order to ensure a good brewing procedure, adhere to these specific steps:
Putting the K-Cup in
- – Raise the K-Cup holder, which is often found at the machine’s front.
- – Place the K-Cup pod of your choice into the holder. Make sure it is seated in the holder securely and is correctly centred.
- – Firmly but gently snap the K-Cup holder shut. The machine will make a puncture sound as it breaks the K-Cup’s seal.
choosing the size of the brew
- – To choose the brew size you desire, use the control panel on your Keurig device. The usual selections are 6, 8, and 10 ounces, however your machine can also provide you with more possibilities.
- – Keep in mind that the size of the cup you choose will affect the volume and strength of your brewed beverage. Stronger brews are produced in smaller cups, whereas gentler brews are produced in larger cups.
Beginning the brewing procedure
- – Press the brew button on the control panel once you’ve determined the size of your brew. The brewing process is started in this manner.
- – The Keurig will start heating the Water and brewing your beverage by running it through the K-Cup. Water is frequently seen pouring into your cup from the translucent water reservoir.
Waiting for the brewing process to be finished
- – Give your Keurig some time to brew your beverage. The actual amount of time depends on the size of the brew and the Keurig model, but it usually takes less than a minute.
- – You may either wait until the machine indicates that brewing is finished, or you can observe the process through the equipment’s see-through water reservoir.
Taking out and discarding the used K-Cup
- – The Keurig will automatically dispense hot Water into your cup after the brewing procedure is complete.
- – Carefully remove the used K-Cup by carefully opening the K-Cup holder. Use caution because it will be hot.
- – Place the used K-Cup in the proper container for disposal. Check the packaging for recycling information if your K-Cups contain recyclable materials.
Query FAQs:
1. What portion of coffee do I use in a cup?
- – Depending on the brand and type of coffee, different K-Cups contain different amounts of coffee. But a regular K-Cup usually has enough coffee in it to make one 6-ounce cup of coffee. A lower brew size can be chosen if you desire a stronger cup, but bear in mind that the flavour will be more concentrated as a result.
You may use your Keurig coffee maker to reliably brew your preferred coffee or beverage if you follow these instructions. You can customise your drink to your tastes with Keurig’s customization options, such as brew size and K-Cup variety.
Upkeep and cleaning
Your Keurig coffee maker needs to be properly maintained and cleaned in order to continue brewing delicious beverages and running smoothly. Here is a thorough instruction manual for caring for and cleaning your Keurig:
Cleaning the drip tray, K-Cup holder, and water reservoir on a regular basis.
– “Drip Tray”:
- – Take off your Keurig’s drip tray and drain any liquid that may be within.
- – Use a non-abrasive cloth or sponge and warm, soapy water to clean the drip tray.
- – Thoroughly rinse the drip tray and let it air dry before reinstalling it in the appliance.
– K-Cup Holder
- – Raise the K-Cup holder out of the vending machine.
- – Use warm, soapy water to wash the K-Cup holder. To avoid clogs, be sure to clean the piercing needle(s) inside the holder.
- – Before reinstalling the K-Cup holder in the Keurig, give it a good rinse and allow it to dry fully.
– Water Storage Facility:
- – Remove the water reservoir and drain any water that is still inside.
- – Scrub the water reservoir well with warm, soapy Water.
- – It’s a good idea to sometimes clean the inside of the water reservoir with a solution of one part white vinegar to one part water in order to prevent mineral accumulation. After that, properly rinse it to get rid of any vinegar residue.
Cleaning the scale from your Keurig (if necessary)
- – Over time, mineral deposits from Water can build up inside your Keurig, altering both the way it works and how your drinks taste. It takes descaling to get rid of these deposits.
- – Use the following procedures to describe your Keurig:
- – Buy a descaling solution or use a solution made from equal parts white vinegar and Water.
- – After emptying the water reservoir, add the descaling solution to it.
- – Begin brewing without first adding a K-Cup. Use the biggest brew size that is offered.
- – Keep doing this until the water reservoir is completely drained.
- – Thoroughly rinse the water reservoir and fill it with fresh Water.
- – To remove any lingering descaling solution, perform repeated brewing cycles with clean Water.
Troubleshooting typical problems (such as blockages and delayed brewing)
- – Refer to your user handbook for suggestions on how to resolve problems with your Keurig, such as clogs or slow brewing. Typical remedies include:
- – Gently unclogging any obstructions in the K-Cup holder or puncture needle(s) with a paperclip.
- – Ensuring there is adequate Water in the water reservoir and that it is seated correctly.
- – Inspecting the water reservoir and the machine’s internal parts for debris.
- – Verifying that your cup’s brew size is set properly.
- – If issues continue, get in touch with Keurig customer service or consult their online resources for further in-depth troubleshooting advice.

Keeping your Keurig in a safe place
- – It’s important to preserve your Keurig properly to avoid damage if you intend to keep it for a long time or while travelling.
- – Wash and dry all removable components, including the drip tray, K-Cup holder, and the water reservoir.
- – Keep your Keurig out of the sun and harsh heat in a dry, cold location.
- – Preserve the machine’s original packaging if at all possible to safeguard it while being transported or stored.
Your Keurig coffee machine will operate at its best and last for a long time if you do routine cleaning and maintenance and use the right troubleshooting techniques when problems do occur. For many years to come, a well-kept Keurig will continue to serve you wonderful drinks.
Guidelines for a Fantastic Keurig Experience
Consider these hints and recommendations to get the most of your Keurig coffee maker and have a wonderful brewing experience:
Trying out several K-Cup flavours and brands
- – The large range of K-Cup flavours and brands available is one benefit of utilising a Keurig. Try out many choices to identify your favourite.
- – Experiment with different coffee blends, roast intensities, and flavour profiles to find the ideal cup for your palate.
- – Experiment with K-Cups for tea, hot chocolate, chai lattes, and other beverages to suit various moods and circumstances rather than sticking to simply coffee.
Your preferred ground coffee can be used with reusable K-Cups.
- – If your favourite coffee blend isn’t offered in K-Cups, you might want to use reusable K-Cup pods.
- – These pods give you the freedom to have your favourite brew while still enjoying the convenience of a Keurig. You can fill them with your favourite ground coffee.
- – Reusable K-Cups are better for the environment since they produce less single-use plastic waste than disposable K-Cups do.

Maintaining your machine properly for lifetime
- – To maintain your Keurig in peak shape, make sure to frequently follow the maintenance and cleaning instructions provided in your user manual.
- – Take care to regularly descale your machine to avoid mineral buildup, which can impair both the unit’s functionality and the flavour of your beverages.
- – To maintain smooth performance, replace any worn or broken components right away. Replacement parts are available from Keurig and are simple to install.
brewing different drinks in your Keurig, such as tea and hot chocolate
- – Keurig machines are not just for making coffee. Utilise your Keurig’s adaptability by producing a range of beverages.
- Use a K-Cup designed for tea or a reusable K-Cup filled with your choice tea leaves or tea bag to create tea.
- – Choose a hot cocoa K-Cup or use your Keurig to drip hot Water over cocoa mix to enjoy hot chocolate.
- – Some Keurig models have options for cooled drinks, making it simple to prepare a cool iced tea or coffee.
You can get the most out of your Keurig coffee maker and design a custom brewing experience that matches your distinct preferences by trying new flavours, using reusable pods, caring for your machine, and experimenting with different beverages.
Conclusion
Let’s review the major themes from this extensive guide on using a Keurig coffee maker as we wrap up, emphasise the ease and adaptability of these devices, and exhort readers to make the most of their Keurig experience:
Recall the essentials of Keurig coffee maker use
- – From choosing the proper K-Cup to adjusting brew size, we’ve covered the fundamentals of how a Keurig machine operates.
- – Cleaning, maintenance, and troubleshooting hints were offered to keep your Keurig in top condition, including descaling.
- – We also looked at methods to improve your Keurig experience, such as experimenting with different K-Cup tastes and using reusable pods for your preferred ground coffee.
Emphasise the ease and adaptability of Keurig machines
Coffee makers made by Keurig are recognized for their unparalleled ease. You may have a freshly prepared cup in only a few minutes thanks to their streamlined coffee making procedure.
- – There is something for every taste preference when it comes to K-Cup varieties and brands, from coffee and tea to hot chocolate and more.
- The adaptability and suitability of Keurig machines for a variety of beverage options make them a useful addition to any kitchen.
Tell readers to experiment with and take pleasure in their Keurig coffee maker
You can improve your daily coffee or beverage routine with the help of your Keurig coffee machine, which is a useful appliance. Enjoy the convenience it provides.
- – Customise your brewing experience to fit your mood and preferences by experimenting with new flavours and beverages.
- – Keep in mind that routine maintenance makes sure your Keurig keeps producing top-notch results. You can drink several cups of your preferred beverages if you keep it clean and well-maintained.
In conclusion, your Keurig coffee maker is more than simply a kitchen tool; it opens up a world of delectable drinks and convenience like no other. You may learn the art of using your Keurig and enjoy every sip of your favourite beverages by paying attention to the advice and recommendations offered in this manual. So feel free to explore and take full advantage of your Keurig!
