
Coffee lovers and home baristas frequently choose Cuisinart espresso machines because of their high quality and practicality. Use cuisinart espresso machine . You may enjoy the robust and aromatic aromas of espresso without leaving your kitchen thanks to these devices, which bring the café experience into the comfort of your home.
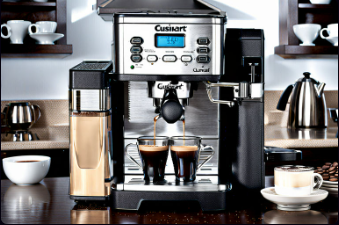
An assortment of espresso machines are available from Cuisinart, a reputable name in the food industry, to suit different tastes and price ranges. These devices are renowned for their user-friendly design, dependability, and reliable operation. Regardless of your level of espresso expertise, Cuisinart espresso machines have something to offer.
We will delve into the world of Cuisinart espresso machines in this thorough guide, assisting you in realizing the full potential of your machine. This article will arm you with the information and abilities required to become your barista, from setup to producing the ideal shot of espresso.
Millions of people around the world have been enthralled by the rich flavor and potent aroma of espresso, a concentrated coffee beverage. Its popularity results from its adaptability; you may sip it straight up as a shot, use it as the base for a variety of coffee beverages, or make rich, creamy lattes and cappuccinos.
As artisanal coffee culture becomes more popular, people attempt to recreate the café experience at home. Home espresso machines are now much more popular as a result of this. People desire the freedom to experiment with various beans, personalize their coffee to their tastes, and create unique drinks without going to a coffee shop.
For coffee enthusiasts who want the perfect espresso shot without the trouble of manual brewing methods, home espresso machines like those provided by Cuisinart have become a necessary kitchen gadget. This fashion speaks to the joy of making gourmet coffee in the comfort of one’s own home and the need for convenience and quality.
This article’s main goal is to act as your all-inclusive guide to the world of Cuisinart espresso machines. It seeks to demystify the operation of these machines so that you may confidently brew excellent espresso and beverages containing espresso.

This manual intends to let novice and seasoned customers get the most out of their Cuisinart espresso machine by breaking down the steps, providing insights into maintenance, and offering troubleshooting advice. This article will become your go-to guide for producing café-quality outcomes in your kitchen, whether you’ve just opened the box on your machine or are trying to improve your espresso-making abilities.
Jump to a Specific Section
- 1 A Cuisinart Espresso Machine’s Preparation
- 2 Recognizing the Elements of a Espresso Machine
- 3 A Guide to Coffee Bean Selection and Grind Size
- 4 Temperature and Water Quality
- 5 Make espresso
- 6 Steaming Milk and Making Espresso Drinks With Milk
- 7 Maintaining and Cleaning & Use cuisinart espresso machine
- 8 Conclusion
A Cuisinart Espresso Machine’s Preparation
Start with the unboxing and inspection procedure when you have your Cuisinart espresso maker. This process ensures that everything is in working order and you have all you need to get started.
1. Opening the package carefully is the first step to avoiding damaging contents. Keep the machine’s original packing if you need to store or transport it.

2. Lay out all the parts and compare them to the list in the user handbook to “Check the Contents”. The espresso machine unit, portafilter, filter baskets, water reservoir, drip tray, and accompanying accessories are common components.
3. Check for Damage: Inspect each component for any indications of deterioration or flaws. Pay close care to the portafilter, which needs to fit snugly and have an unbroken, clean gasket.
Building the Device
It’s time to put your Cuisinart espresso machine together once you’ve ensured all the parts are intact. A machine that has been assembled properly will function reliably and safely.
1. Choosing an appropriate location for the machine in your kitchen with access to a power outlet and enough room for the appliance and its attachments is known as “positioning the machine.” Make sure the ground is firm and level.
2. Attaching the Drip Tray: Place the drip tray in the machine’s specified slot. This tray will catch any spilled water or coffee during the brewing process.
3. Water Reservoir: Place the water reservoir in the machine’s assigned location. Following the machine’s capacity and the instructions in the user handbook, fill it with clean, filtered water.
4. Portafilter and Filter Baskets: Select the proper filter basket (single or double) and place it inside the portafilter according to the size of the shot you want. Verify that it fits snugly.
5. Pre-Warming: It is advised to pre-warm the cups and portafilter before Brewing. By doing so, the ideal temperature for espresso extraction is maintained. Pour hot water (without coffee grounds) through the machine.
Initial maintenance and cleaning
Your Cuisinart espresso maker will function at its peak and maintain good condition over time with proper upkeep from the start.
1. Cleaning the Machine: Use a moist cloth to remove any production debris or dust from the machine’s exterior. Make sure all parts are spotless and free of any extraneous objects.
2. When available, certain espresso machines include the option of backflushing, which aids in cleaning the machine’s internal components. To determine whether this step is necessary for your Cuisinart model, consult the user handbook.
3. Before using the machine for the first time, run a water cycle through it without any coffee to ensure the internal plumbing is clear. Additionally, this aids in removing any leftover manufacturing fluids or particulates.
4. Maintenance routine: Read the user handbook to become familiar with the suggested maintenance routine. Your espresso machine’s lifespan and the caliber of your coffee will be maintained by routine cleaning and maintenance.
You’ll lay a strong foundation for making delectable espresso and beverages based on espresso if you carefully follow these instructions to set up your Cuisinart machine. Your machine will last longer and perform better if assembled and maintained properly, allowing you to enjoy many cups of excellent coffee.
Recognizing the Elements of a Espresso Machine
Understanding the many parts of your Cuisinart espresso machine and how they work is essential for efficient use. Here is a thorough summary:
1. The water reservoir, a removable container, is where the water for brewing espresso is kept. Usually, it’s on the side or rear of the machine. To retain the freshness of your coffee, use only fresh, filtered water.
2. The portafilter is a handle-like device that holds the coffee grounds during Brewing. The filter baskets inside the portafilter determine the size and potency of your espresso shot. Both single and double-shot baskets are standard on most machines.

3. The steam wand, often found on the machine’s side, is a metal tube. It is used to steam and froth milk for making lattes, cappuccinos, and other milk-based espresso drinks. Making these drinks requires proper steam wand technique, which must be learned.
4. The drip tray catches any water or coffee that may spill during Brewing and is located below the portafilter and steam wand. It is detachable for simple cleaning. Frequently empty and clean the drip tray to avoid mold or residue buildup.
5. Control Panel and Buttons: The control panel is your Cuisinart espresso machine’s user interface. To brew a single or double shot, change the water’s temperature, or operate the steam wand are just a few of its controls and buttons. Learn how to use these parameters to personalize your coffee-making process.
Warnings and Precautions for Safety
Due to the heat, pressure, and electrical components involved in operating an espresso machine, it’s crucial to take safety precautions to protect both your health and the equipment’s longevity:
1. Read the User Handbook: Read the Cuisinart espresso maker’s user handbook to begin. Relevant safety precautions and usage directions relevant to your model are provided in the manual.
2. Place your espresso maker on a level, solid platform with access to a grounded electrical socket. Ensure there is enough ventilation, and keep the equipment from anything combustible.
3. Water and Electricity: Always keep water away from the machine’s electrical parts. When not in use, keep the water reservoir closed and make sure all the connections are tight.
4. Hot Surfaces: The machine’s exterior and steam wand get warm while in use. Always utilize the available handles or knobs and exercise caution when handling these components.
5. Clean and maintain your espresso maker regularly to avoid the accumulation of coffee grounds, oils, or residue. When cleaning, always unplug the machine.
6. Keep kids and pets away from the machine while it’s running because there could be burn hazards. Keep extra parts and accessories out of their reach.
7. To avoid mineral buildup in the equipment, please use fresh, filtered water in the reservoir. Additionally, this will result in espresso that tastes better.
8. Maintenance Schedule: To keep the device operating securely and effectively over time, adhere to the suggested maintenance schedule included in the user manual.
You may improve your espresso-making experience and use your Cuisinart espresso machine safely and effectively by understanding the parts and following safety guidelines.
A Guide to Coffee Bean Selection and Grind Size
The quality of the coffee beans you select forms the basis of an excellent espresso. Using top-notch coffee beans can significantly impact the flavor, aroma, and satisfaction you get from your espresso. This is why it’s essential:
1. Complexity of Flavor: High-quality coffee beans come in various flavors, from fruity and floral to nutty and chocolatey. High-quality beans have these subtleties more clearly defined, letting you enjoy an espresso that is both complex and gratifying.
2. Quality beans are usually more recently roasted, keeping their freshness. The crema and aroma of your espresso are both influenced by the carbon dioxide gas that is released when beans are freshly roasted. A brew with stale beans may taste bland.

3. High-quality beans are carefully obtained and processed, resulting in a more constant size and density. This uniformity is crucial for an even extraction, preventing under- or over-extraction of your espresso shot.
4. Supporting reputable coffee roasters who stress ethical and sustainable sourcing methods can ensure that you’re making a positive impact on the coffee industry.
Understanding the Importance of Grind Size
When making espresso, the grind size of your coffee beans is quite important. It has an impact on the extraction procedure, which in turn impacts the flavor and quality of your espresso. Why grind size counts is as follows:
1. Surface Area: The amount of coffee particles’ surface area depends on the grind size. While coarse grinds have less surface area and slower extraction, finer grinds offer greater surface area, enabling faster extraction.
2. Extraction Time: To get the appropriate flavor, the extraction time needs to be adjusted. While longer extraction durations are needed for coarse grinds, shorter extraction times are needed for finer grinds. Without over- or under-extracting, the objective is to extract the perfect tastes.
3. The grind size has an effect on the flavor and aroma of your espresso. A coarser grind could result in a milder taste, whereas a finer grind frequently produces a richer, more powerful flavor. You may tailor your espresso to your taste preferences by changing the grind size.
4. Crema: The creamy, caramel-coloured coating that forms on top of your espresso is affected by the grind size. A well ground cup of coffee will help create a thick, enduring crema.
Recommended Espresso Grind Size
It can take a little bit of creativity to get the proper grind size for espresso. However, as a general rule, espresso is best made with a fine to medium-fine grind. This is how to determine the appropriate grind size:
1. Purchase a high-quality burr grinder made specifically for espresso. Compared to blade grinders, burr grinders produce outcomes that are more consistently good.
2. The majority of espresso machines let you change the grind size. Start with a medium-fine setting and then, according to taste, make a few slight adjustments.

3. Taste testing is the most effective method for determining the optimal grind size. Aim for a shot that is balanced, with a well-defined flavor, and a creamy crema.
4. Don’t be scared to play about with the grind size. The appropriate grind size might vary depending on the origin and degree of roast of the coffee bean, so be willing to experiment.
In conclusion, excellent espresso is crafted by carefully controlling the grind size and the quality of your coffee beans. You’ll be well on your way to experiencing the full spectrum of flavors and fragrances that espresso has to offer by selecting high-quality beans and perfecting the grind size.
Temperature and Water Quality
The flavor and general quality of your coffee are greatly influenced by the type of water you use to brew your espresso. Why using filtered water is crucial as explained here:
1. Impurities like chlorine, salts, and sediment that might impair the flavor of your espresso are removed by filtering the water. These contaminants have the potential to impart off flavors and change the scent.
2. Filtered water has a more consistent flavor because its mineral content and flavor are less likely to vary than those of tap water. The key to perfecting your espresso recipe is consistency.

3. Using filtered water can help prevent scale accumulation in the interior components of your espresso machine. Scale can damage heating elements and clog pipes, lowering the machine’s performance and lifespan.
4. Clean, filtered water helps the coffee’s inherent flavors to come through, making for a more aromatic and pleasurable espresso experience.
Changing the Settings for the Water Temperature
Another important element in brewing the ideal shot of espresso is the water temperature. This is why temperature regulation is important:
1. Water temperature has a direct impact on the extraction process (extraction control). Water that is too hot can extract the coffee too much, producing a harsh flavor, while water that is too cold can extract the coffee too little, producing a weak, sour shot.
2. The recommended water temperature for espresso is between 195°F and 205°F (90°C and 96°C). Flavour Development. The coffee grounds best release their flavors and fragrances within this range.
3. The creation of crema, the smooth top layer of an espresso shot, depends on the temperature of the water. Crema is produced when gasses and oils are extracted at the ideal temperature.
4. Consistency: With the ability to control and maintain the water temperature, modern espresso machines make it possible to brew each shot under the same conditions.
The Machine and Portafilter Are Preheated
It is crucial to pre-heat both the espresso maker and the portafilter before making your espresso. Why this action is essential is as follows:
1. Stable Temperature: Preheating the machine guarantees that its internal parts, including as the group head and the portafilter, are at the ideal brewing temperature. This keeps the espresso maker’s thermal stability intact.
2. Even extraction: A warmed portafilter keeps the espresso shot from evaporating too soon when it comes into contact with the metal. The quality of the shot can be impacted by an uneven extraction caused by a cold portafilter.
3. Consistency is important when brewing espresso. You may reduce variables that might affect the flavor and quality of your espresso by preheating the machine and portafilter before each shot.
4. Preheating doesn’t take long and can be done while you’re prepping other parts of your espresso-making procedure or grinding your coffee beans.
In conclusion, the key elements of making the ideal espresso are using high-quality water, managing the temperature, and preheating. By using filtered water, you can get clear, consistent results; by changing the water’s temperature, you can get the best flavor extraction; and by preheating the espresso maker and portafilter, you can get consistent, even espresso shots.
Make espresso
Combining science and art is required to brew the ideal espresso shot. Here is a thorough, step-by-step tutorial to assist you in mastering the procedure:
1. Filling the Water Storage Tank:
– Make sure the espresso maker is off.
– Take out the water reservoir, then fill it with clean, filtered water to the mark on the reservoir or the level recommended in your machine’s handbook.
– Firmly reinstall the filled reservoir into the apparatus.
2. Starting the Device:
- – Turn on the espresso maker and give it some time to warm up. The majority of machines include display screens or indication lights that let you know when they’re ready to start Brewing.
- – You must wait until the machine achieves the proper brewing temperature, which is often between 195°F and 205°F (90°C and 96°C).
3. Warming Up the Portafilter in Advance:
- – Pre-warm the portafilter to preserve the espresso’s temperature during extraction. It should be taken out of the machine and given a brief period of hot water flow.
- – Thoroughly dry the portafilter, making sure there is no standing water within.
4. Coffee grounds should be dosed and tamped.
- – Calculate the correct amount of coffee grounds (single or double) for the shot size you choose. Typically, 7-9 grams of coffee are needed for a single shot, while 14–18 grams are needed for a double shot.
- – Fill the portafilter basket with the coffee grinds in a uniform layer.
- – Firmly and uniformly compact the coffee grinds with a tamper. Put even pressure on the puck to make it level and compact.
5. Place the Portafilter here:
- – Place the loaded portafilter within the espresso maker’s group head. Make sure the lock is tight.
6. Making a Brewing Decision (Single or Double Shot):
- A single shot and a double shot can typically be selected using buttons or knobs on espresso machines.
- – Based on your preferences, choose the one you want.
7. Starting the extraction process and keeping an eye on it:
- – Press the appropriate button or lever to begin the extraction operation.
- – Pay special attention to the shot as the espresso is Brewing. For a 1-ounce shot, the typical extraction time is between 25 and 30 seconds. This time should be adjusted based on grind size and flavor.
- – Pay attention to the espresso’s flow; it should be consistent and make a thick, rich stream. A gorgeous, caramel-coloured crema will be on top of a shot that has been properly extracted.
Troubleshooting Typical Problems
Despite your best efforts, producing espresso can occasionally be difficult. Following are some typical problems and solutions:
1. Espresso that’s bitter:
- – Over-extraction, an inadequate grind, or an excessive amount of coffee are potential causes.
- – For troubleshooting, increase the grind size, lessen the quantity of coffee grounds, or speed up the extraction process.
2. Coffee that’s sour:
- – Under-extraction, an excessively coarse grind, or insufficient coffee are some potential causes.
- – Troubleshooting: Increase the quantity of coffee grounds, lengthen the extraction time, or fine-tune the grind size.
3. Leaking or Dripping:
- – Potential causes include incorrectly inserted portafilters, broken gaskets, and improperly tamped grinds.
- – Troubleshooting: Make sure the tamping is even, look for damage to the portafilter gasket, and confirm that the portafilter locks firmly in place.
4. No Cremation
- – Inadequate tamping pressure, stale coffee beans, or an incorrect grind size are potential causes.
- – To fix the problem, alter your tamping method, use freshly roasted beans, and make sure the grind size is appropriate for espresso.
5. Unreliable Shots:
- – Variations in tamp pressure or an uneven distribution of coffee grounds in the portafilter are two potential causes.
- – Troubleshooting: To generate a level puck, distribute the grounds uniformly and tamp with steady pressure.
You can regularly make outstanding espresso shots with practice and attention to detail. Troubleshooting common problems is a necessary step in learning, and making adjustments can eventually produce better outcomes.
Steaming Milk and Making Espresso Drinks With Milk
Making milk-based espresso beverages requires careful milk preparation. Here’s how to prepare the milk whether you’re creating a cappuccino, latte, or any other milk-based coffee beverage:
1. A fresh, cool milk of your choice, such as full milk, 2%, skim milk, or non-dairy substitutes like almond, soy, or oat milk, should be used in this recipe. The flavour and texture of the foam are influenced by the milk’s fat level.
2. Use a stainless steel frothing pitcher that is suitable for the volume of milk you intend to froth. A larger pitcher is appropriate for numerous drinks, while a smaller one is good for single servings.

3. Start with cold milk, and make sure the steam wand and milk frothing pitcher are both clean and clear of any leftover residue from prior uses.
Making Milk Froth with the Steam Wand
Your espresso maker’s steam wand is the most important piece of equipment for foaming milk. Here’s how to utilize it successfully:
1. Position the steam wand in the frothing pitcher so that it is slightly below the milk’s surface before activating the steam wand.
2. Purge the Wand: Before frothing, briefly turn the steam wand into a drip tray or another container to remove any remaining water. This guarantees that you begin with dry steam.
3. Put the steam wand back into the milk and turn on the texture and temperature controls. To encourage equal heating and foaming of the milk, place the tip of the steam wand slightly off-center to generate a swirling motion in the milk.
4. Frothing Methods:
- – To make a cappuccino, froth the milk until it doubles in volume and takes on the texture of dense microfoam. The milk must be warm but not boiling.
- – Aim for a microfoam that is creamier and more velvet-like for lattes. The ideal temperature for milk is normally between 150°F and 160°F (65°C and 71°C).
5. Keep a thermometer in the milk while it is being frothed to keep track of the temperature. To prevent scorching the milk and affecting the flavor, avoid overheating.
6. When the milk reaches the proper temperature and consistency, immediately shut off the steam wand to avoid overheating.
7. After frothing, clean the steam wand by purging it once more and wiping it off to avoid milk residue drying and blocking the wand.
C. Making Popular Drinks with Espresso and Milk
You are now prepared to make a range of milk-based espresso drinks, including cappuccinos, lattes, and more, after successfully boiling and foaming the milk:
1. Cappuccino:
- – Make an espresso shot.
- – Fill a cup with an equal amount of frothed milk and milk foam.
- – Top the espresso with the milk foam.
2. Latte:
- – Brew an espresso shot.
- – Fill up the espresso cup with steamed milk.
- – Optionally add some milk foam or microfoam to the surface to make latte art.
3. Mocha:
- – Make an espresso shot.
- – To the espresso, stir in the chocolate syrup.
- – Pour steamed milk on top of the chocolate and espresso.
- – If preferred, garnish with whipped cream and a dash of chocolate powder.
4. [Flat White]
- – Brew an espresso shot.
- – Steamed milk should be added to espresso to produce a silky microfoam.
- – A flat white has a higher ratio of coffee to milk, giving it a robust coffee flavour and smooth texture.
5. Macchiato:
- – Take an espresso shot.
- – To give the espresso a “stained” or “marked” appearance, top it with a small bit of frothed milk or milk foam.
6. Affogato:
- – Brew an espresso shot.
- – To create a delicious contrast of hot espresso and cold, creamy ice cream, serve it over a scoop of vanilla ice cream or gelato.
By mastering the technique of blending espresso and frothed milk, you may make a wide variety of coffee drinks, each with a distinctive flavor profile and presentation. A world of coffee inventiveness will be unlocked by perfecting milk frothing methods and experimenting with various recipes.
Maintaining and Cleaning & Use cuisinart espresso machine
To preserve the longevity and best performance of your Cuisinart espresso machine, maintain a daily cleaning schedule. An instruction manual for your everyday cleaning is provided below:
1. Empty the old Coffee Grounds and Drip Tray First, take out the old coffee grounds and drip tray. To avoid mold and odor growth, completely empty and rinse them.
2. Clean the portafilter by taking out the coffee puck and rinsing it after each use. To get rid of any leftover coffee oils, thoroughly clean the portafilter with a moist cloth.
3. Run a brief stream of hot water through the group head without the portafilter attached to “flush” it. This removes any leftover coffee grounds and promotes cleanliness.
4. Clean the machine’s exterior, including the control panel, the steam wand, and the drop tray area, with a moist cloth. Make sure there are no spills or coffee residues remaining.

5. Remove the water reservoir and give it a thorough wash with warm water to check the water reservoir. Allow it to dry naturally and, if necessary, clean it with a soft cloth.
Tasks for Weekly and Monthly Maintenance
To keep your Cuisinart espresso maker in good condition, in addition to daily cleaning, there are weekly and monthly maintenance activities to complete:
Weekly chores:
1. Clean the Drip Tray and Reservoir: Take out the water reservoir and drip tray. Rinse them well after washing them in warm, soapy water. Before assembling again, make sure they are thoroughly dry.
2. Disassemble the portafilter and filter baskets in order to clean them. After a brief soak in warm, soapy water, use a brush to scrub away any coffee stains. Dry them after rinsing.
3. Inspect the Gasket: Look for evidence of wear or damage on the portafilter gasket. To maintain a proper seal, think about replacing it if it’s broken or worn out.
Daily Tasks:
1. Backflush the Machine (If Applicable): To clean internal components, some espresso machines have a backflushing mechanism. For details on how to do this task, consult the user guide for your machine.
2. Remove the steam wand tip (if removable) and soak it in warm, soapy water to clean it. To thoroughly clean the inside of the wand, use a steam wand brush. Reattach the tip after rinsing.
3. Remove and clean any accessible sections of the drip tray and drainage system. Inspect and Clean the Drip Tray and Drainage System. Verify that there are no obstructions, mold, or accumulation there.
Scaling down the device
Descaling is a crucial maintenance procedure that aids in removing mineral deposits that can accumulate over time in the interior components of the espresso machine. The amount of hardness in your water and how frequently you use the machine will determine how frequently you need to descale it. To descale your Cuisinart espresso maker, follow these steps:
1. Prepare the descaling solution as directed by the manufacturer, either by purchasing a ready-made product or by combining water and a food-grade acid (such as vinegar or citric acid).
2. Empty the Water Reservoir: Make sure there is no water left in the water reservoir.
3. Descaling Solution into the Reservoir: Fill the water reservoir with the ready-made descaling solution.
4. Run the descaling cycle by adhering to the directions provided by your machine. Usually, this entails adding the solution to the machine, running it through, and then washing it with water.
5. After the descaling cycle, completely rinse away any residual descaling solution by repeatedly running clean water through the machine.
6. Wipe clean the exterior of the machine, the steam wand, and other parts as you are descaling to get rid of any residue from the descaling procedure.
Descaling your espresso machine on a regular basis keeps it running smoothly and guarantees that your coffee tastes its best. To prevent any potential harm to your machine, be sure to adhere to the manufacturer’s descaling guidelines.
You can keep your Cuisinart espresso machine in top shape and brew good coffee for years to come according to these daily, weekly, and monthly cleaning and maintenance schedules, along with thorough descaling.
Conclusion
The skill of utilizing a Cuisinart espresso machine to make café-quality espresso at home has been thoroughly covered in this in-depth guide. Let’s review the main ideas this post tried to convey:
- – We started with an overview of Cuisinart espresso machines, highlighting both their widespread use and the goal of this guide, which is to offer a step-by-step tutorial on utilizing these machines.
- – We went over the crucial procedures for setting up your Cuisinart espresso machine, including unpacking, examining, and cleaning it for the first time.
- – Emphasis was placed on comprehending the functions of the machine’s many parts, such as the water reservoir, portafilter, steam wand, drip tray, and control panel.
- – In order to make the ideal espresso shot, we looked at the relevance of choosing high-quality coffee beans and the impact of grind size.
- – You gained knowledge of the significance of controlling the temperature and the quality of the water by learning how to use filtered water, change temperature settings, and warm up the machine and portafilter.
- – The specific steps involved in making espresso, such as dosing, tamping, choosing shot sizes, and resolving frequent problems, were described.
- – We experimented with steaming milk and making espresso drinks with milk, including cappuccinos, lattes, and others.
- – Daily cleaning, weekly, and monthly maintenance chores, as well as descaling, were all included in the cleaning and maintenance schedules.
Inspiring Readers to Experiment and Practice to Improve Their Espresso-Making Techniques
It takes experience and experimentation to master the craft of producing espresso. Keep in mind that each stage in the espresso-making process with your Cuisinart machine affects the caliber of your coffee. Initial difficulties shouldn’t deter you; rather, seize them as a chance to improve your abilities.
Discover the flavors and fragrances that best fit your taste preferences by experimenting with various coffee beans, grind sizes, and brewing methods. Your voyage will be satisfying, full of pleasant discoveries and an ever-increasing admiration for the espresso world.
The Joy of Having Café-Quality Espresso at Home, Again
Lastly, there’s a special satisfaction in shipping café-quality espresso without leaving the coziness of your house. You have the ability to create superb shots and milk-based drinks with your Cuisinart espresso machine that are on par with those from your preferred coffee shop. Enjoy the delight of crafting and sipping your own custom espresso drinks that are made to your specific preferences.
The world of espresso is at your fingertips, whether you’re enjoying a morning espresso, a cappuccino with friends, or a warm latte on a wet afternoon. With the information and abilities you’ve learned from this guide, you’re prepared to start a lifelong exploration and love of coffee.
So let’s toast to innumerable cups of superb espresso and all the opportunities your home barista experience holds. Salutations and happy Brewing!
